
Last Updated on September 27, 2019
I knew eventually I would want to make some parts for my sim, and perhaps try my hand at some simple prototyping projects, so I have been thinking about a 3D printer for some time now.
Last time I looked (several years ago) they were still expensive and the technology wasn’t quite as mature as it is now. I was delightfully surprised at the wide array of options available today at all sorts of price points.
Selecting the 3D Printer
My 3D printer requirements entailed something fairly inexpensive since I was just starting out, something solid, capable, a decent print area and a heated bed so the material would stick better. And of course, mostly positive reviews.
As I did my research I found there were so many options it was almost overwhelming. To make things more difficult, both the expensive and inexpensive printers seemed to be reviewed about the same. Other than perhaps size and brand, there didn’t seem to be much difference between them. You always had the extremes of those who loved their printer and those who hated it. It was pretty hard to get a good read.
So I figured let me start with something inexpensive and see how it goes. I narrowed my range to $500 USD or less, with less being better. After a lot of research reading reviews and analyzing pros and cons based on the requirements I stated earlier, my research led me to pull the trigger on a Creality Ender 3 printer kit on Amazon. It cost me less than $250 USD and comes with the base already assembled. You just have to finish assembly. If you are like me and enjoy putting things together (you’re a sim enthusiast so I figure you probably do!), this assembly is a piece of cake. With barely an issue, the printer went together in around an hour and was ready to print. Another nice thing is there seems to be a lot of community support for this printer which is always nice when you’re trying to troubleshoot.
Here’s what my 3D printer setup ended up looking like after it was assembled:

I have to say, the Ender 3 is one solid printer for the money and I am very happy with it after several weeks of pretty continuous printing. The only downside so far is the printer doesn’t have auto-leveling so before each print you have to manually adjust the bed to make sure it is perfectly level or you’ll have issues with bed adhesion and alignment. Not a big deal really. It’s easy to do and takes just a few minutes.
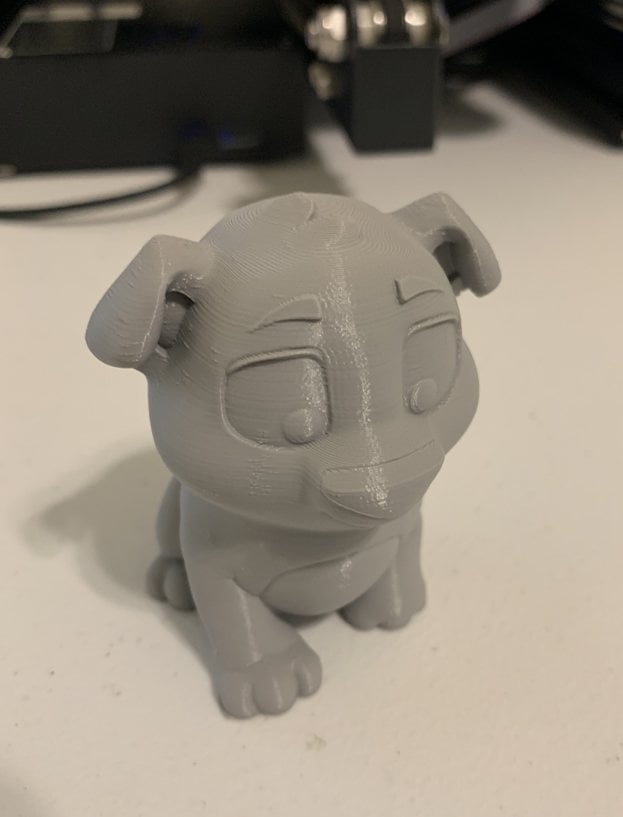
My First 3D Print
Now having watched some YouTube videos to get an understanding of the basics of 3D printing and setup I decided to try my first test print, a model of a cartoonish dog that was included on the micro SD card that came with the printer. I was surprised at how quickly I was able to print out a decent first model with minimal effort.
As you can see below, my first attempt went quite well:
Pedestal Blanking Panels
With the basics out of the way, the first things I wanted to try printing were some pedestal blanking plates, like the real aircraft have, to cover up all the unsightly open holes in my pedestal as you can see below:

I have been using the free version of Autodesk Fusion360 for some time to create 3D models for other projects. I highly recommend this program for your 3D design projects. It is pretty easy to use and quite powerful in my opinion, especially for a free product.
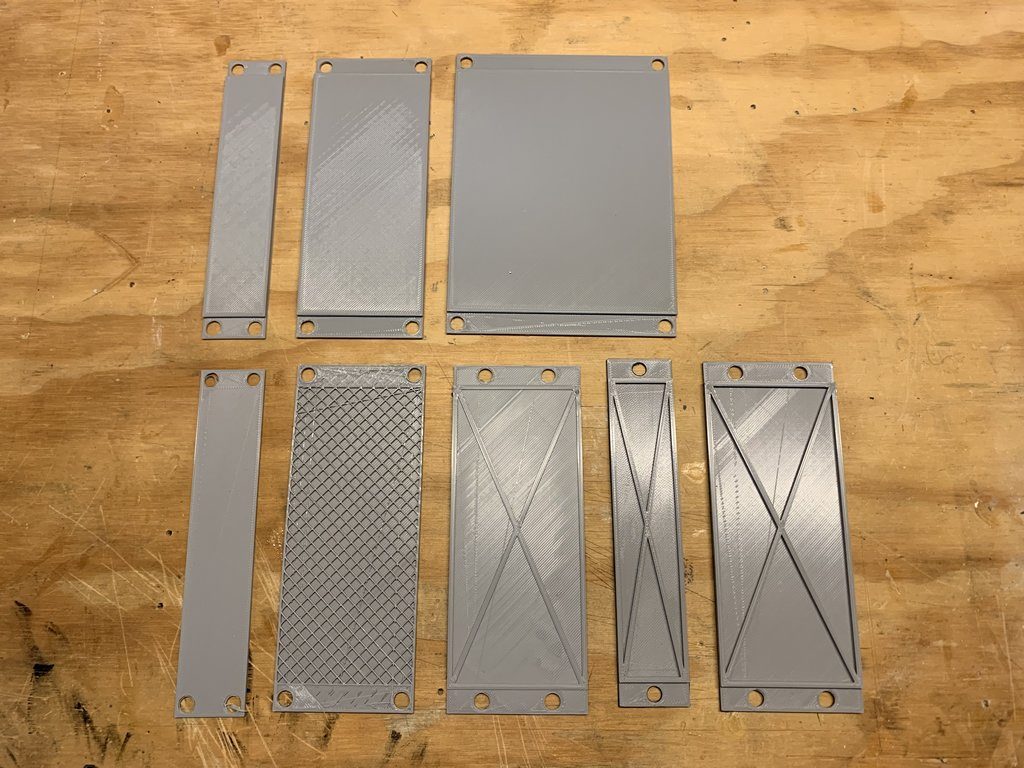
Using Fusion360 I was able to pretty quickly create some blanking plate designs using reference documentation for my DZUS rails and knowing the panels come in 1″, 2″ and 4″ heights. Since I am using real DZUS rails I had to make sure the blanking plate holes lined up properly so I could use my real DZUS screws. Ultimately that is where I had the most difficulty…I went through several design/print iterations until the DZUS rail holes matched perfectly and multiple plates were fitting one after the other properly.
My final design was a 2mm thick top layer with 3mm cross-brace underneath to add strength. I originally tried just a 2mm flat plate, but the plastic bent too easily to rest anything of weight on top of it. So I then went with a thicker, solid center section and that worked well, but used a lot of material and took longer to print. I eventually settled on a cross-brace design that added strength, reduced material usage, and thus reduced print time.
Here’s how my final 1″ blanking plate design looked in Fusion360:
Once I settled on the design, I exported the model from Fusion360 as a .STL file. I was then able to import it straight into Simplify3D, a powerful payware desktop application (around $150USD) that I purchased for total 3D printing control. I initially tried Cura, a free 3D printing program recommended by the Creality printer folks and that is plenty powerful and does the job fine. I just ended up liking all the extra options and better support I have with Simplify3D so that is the software I decided to stick with.
From Simplify3D I was able to send the model to the printer via USB cable. Below are some iterations I went through trying different designs. The bottom two on the right are examples of the 1″ (Fusion360 model above) and 2″ designs I finally settled on.
Once the pieces were printed I applied some Boeing gray acrylic paint and attached the panels to my pedestal DZUS rails with the unpainted aviation DZUS screws I was able to find on eBay. You can see how much nicer it looks now:

I still have some tweaking to do (like figuring out how to paint the DZUS screws so the paint doesn’t chip off…anodize maybe?) but for the most part they came out exactly as I had hoped.
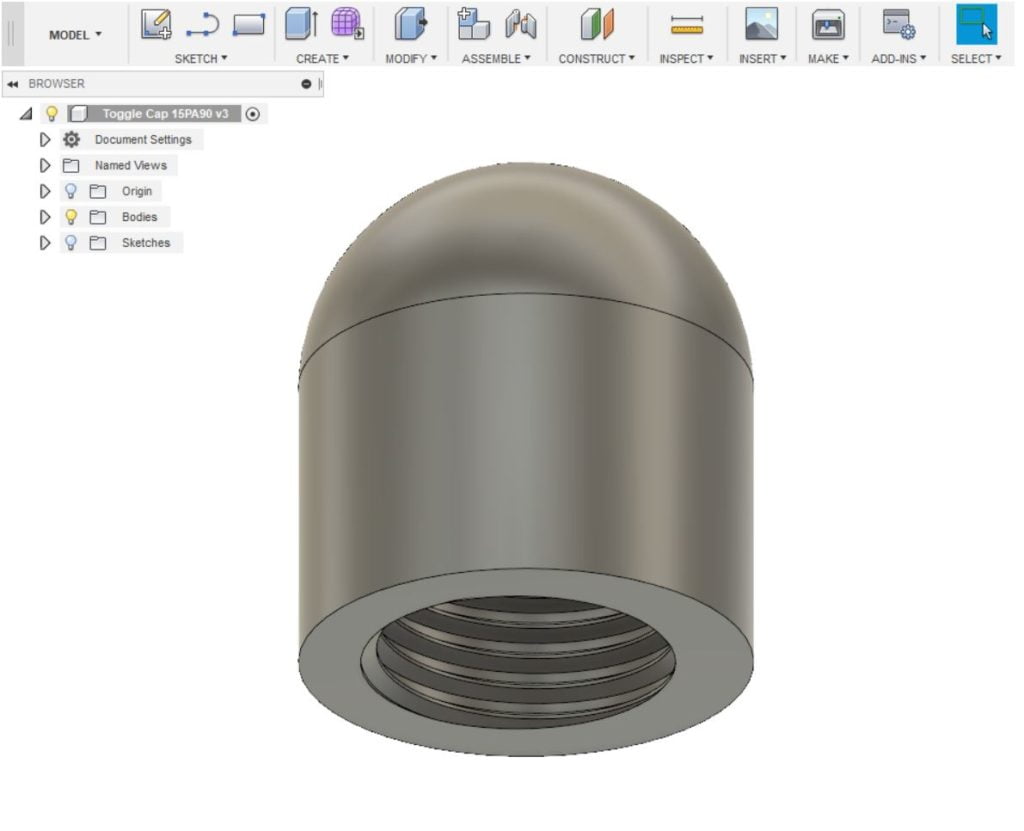
Locking Toggle Switch Caps
The next project I decided to tackle was replacing the silver locking toggle switch caps on my overhead with white caps like the real aircraft. I purchased real Honeywell locking toggle switches for my overhead but they only come with silver caps, not the white ones that you see in a typical 737NG overhead. Problem is, the white caps cost around $15 average each because they have to be designed to aircraft spec and durability, and they have a rubberized outer coating with a metal thread inside. While I was able to find them for around $11 each, I needed 28 so that’s easily $300 on switch caps! I figured I could save big time here if I could make authentic looking caps.
After doing some research, I found the real cap dimensions (Honeywell P/N 15PA90-6W) and was able to quickly translate that to Fusion360, recreating it exactly like the real thing with proper threads and all. You can see my design below:
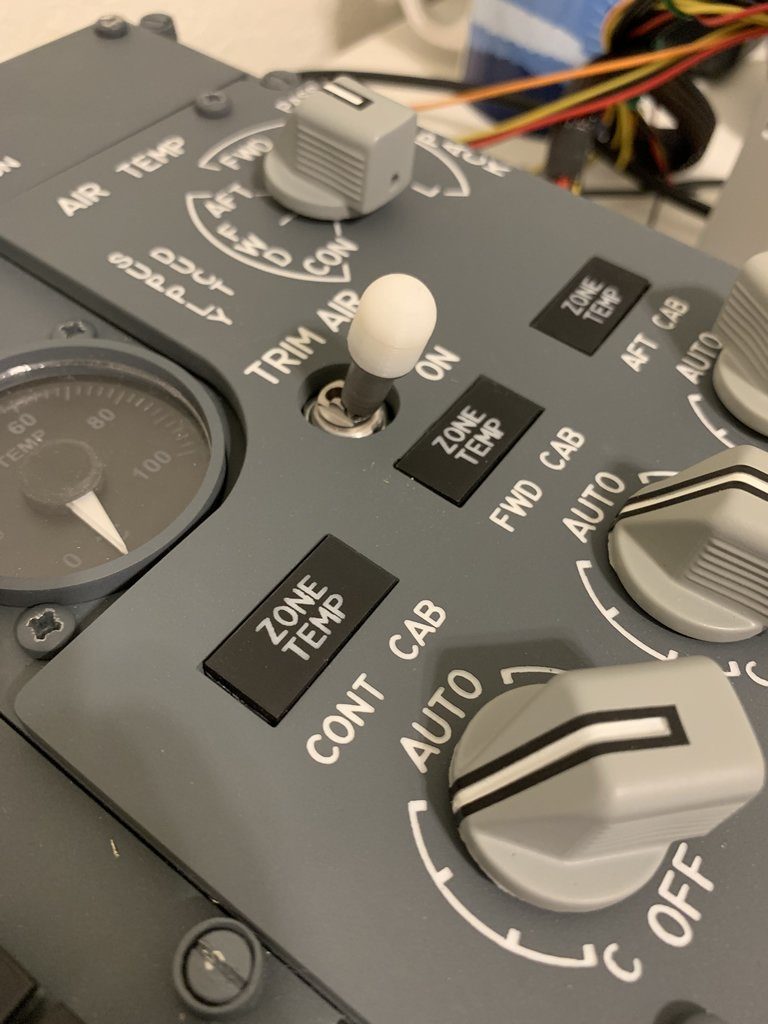
Using white PLA plastic filament this time, I transferred the model to Simplify3D and then printed it out on the printer. To ensure the cap has a good surface to adhere to, I had the printer first create a “raft” which is a base that just peels off when the print is done.

Once I separated the cap from the raft and lightly sanded it a little, I screwed the cap onto the toggle switch. It screwed on perfectly and tightened down nicely. The end result looks fantastic! What do you think? I think I just saved around $300!
Conclusion
I have to say, I am very happy I purchased a 3D printer, and the Creality Ender 3 was a very good choice for me. I feel like now I can easily design and create almost any small parts I need, including gears, knobs, brackets, plates, housings, retainers, and really anything you can think of, then easily duplicate them any time I need to make more.
While there is a small learning curve for the printer, there are literally tons of resources out there to help you. The YouTube videos helped the most. And despite the small problems I had (almost entirely with material initially sticking to the build plate) honestly it has been a fun experience and I’m looking forward to improving the quality of my prints and designing new things.
But as you can see from my projects above the end results are pretty convincing and the savings is substantial which makes it all worth it. I mean, the savings on the caps alone just paid for the printer!
Happy printing!


Hi, if you mean the two rails that run from front to rear and the cross strut, yes those came…