
Last Updated on April 6, 2021
I’m starting to work on smaller details of my sim now that most of the major things (at least, those I can afford) are mostly complete. One of the areas I wanted to enhance was cockpit placards (or decals, stickers, whatever you want to call them).
I looked around on the Internet and there were a few folks I found selling pre-printed, pre-cut sticker sheets. None of them had the stickers I really wanted on them, so being a hobbyist and knowing enough how to use a photo editor I figured, hey, I can just make them myself! But where to begin?! How do I make those perfectly cut sticker sheets?
Home-made stickers are quite popular in the craft world, so there’s fortunately a lot of information online on how to make them. None, of course, were tailored to the simulation enthusiast, but the concept is the same.
Vinyl Sticker Paper
The first step is to find the right sticker paper. After some research online, it seems Vinyl sticker paper is the most popular paper to use for this purpose. So I went down to the local office supply store and bought some vinyl sticker inkjet paper in standard 8.5″x11″ letter size. All my store had was Matte (no shine) vinyl paper, which is ok, but ideally from what I’ve read, a gloss finish is better in terms of the quality of print you’ll get since it doesn’t absorb the ink and dull the finished product as much.
You can find vinyl sticker paper aplenty on Amazon if you do a search for “Vinyl Sticker Paper”. However, my Matte finish paper still worked out just fine as far as I’m concerned.
Creating the Placards in Photoshop
Next, using Photoshop I designed the placards I wanted on a 8.5″ x 11″ sized background using references from online photos at Airliners.net and other sources I have to approximate the size, shape, and lettering. This will take some trial and error, of course. I have not found a source for exact dimensions of the placards. Even the Boeing references I have seen only provide the verbiage and placement of the placards, not the actual dimensions. So unless you know someone who has regular access to the cockpit you’re trying to replicate, you’ll have to settle with approximations.
As I designed my sticker sheet I made sure to leave left plenty of space around each decal for cutting ease, and laid things out to make the best use of the paper for the decals I wanted to print. It ended up looking like the following:
Printing the Placards
I have a simple Brother Multifunction Inkjet printer. First, I printed the sticker sheet on plain copy paper in draft printer settings as to not waste ink while I made sure everything came out sized and looking right.
Once I was satisfied, I printed the placards on the sticker paper using my printers Photo quality setting and they ended up coming out perfectly.
NOTE: Make sure you test your print first on plain paper to ensure your Inkjet doesn’t leave lines or gaps due to blocked printer heads. I had to clean my printer heads several times before it was ready to print perfectly.
The final result on the sticker paper came out quite nice, and the matte paper, in my opinion, looks quite good:
Cutting the Placards – By Hand or Machine?
At first I tried cutting these placards by hand. I used a straight cutter for the straight lines, but even with a modelers knife I could never get the rounded corners and circles just right to where it looked good. And hand cutting all these stickers one by one was tedious. Perhaps you have a steadier hand, but being “obsessive” as I am, that wasn’t good enough for me.
I decided, instead, that I wanted to have each placard perfectly cut like you see on most commercial sticker sheets. This way I could peel the pre-cut stickers right off the backing. To do this, however, requires a dedicated robotic cutting machine.
Researching online and watching some more YouTube videos, there seemed to be two major players in the craft machine cutter world: Cricut (pronounced Cricket) and Silhouette Cameo. Neither is cheap, running around $250-300 USD, but I figured my wife could use it for making her own custom crafts so it was a win-win! (keeping your significant other happy is critical to our success in this hobby!)
The Silhouette Cameo 4, shown below, was my choice as the included software seemed much better for my purposes.
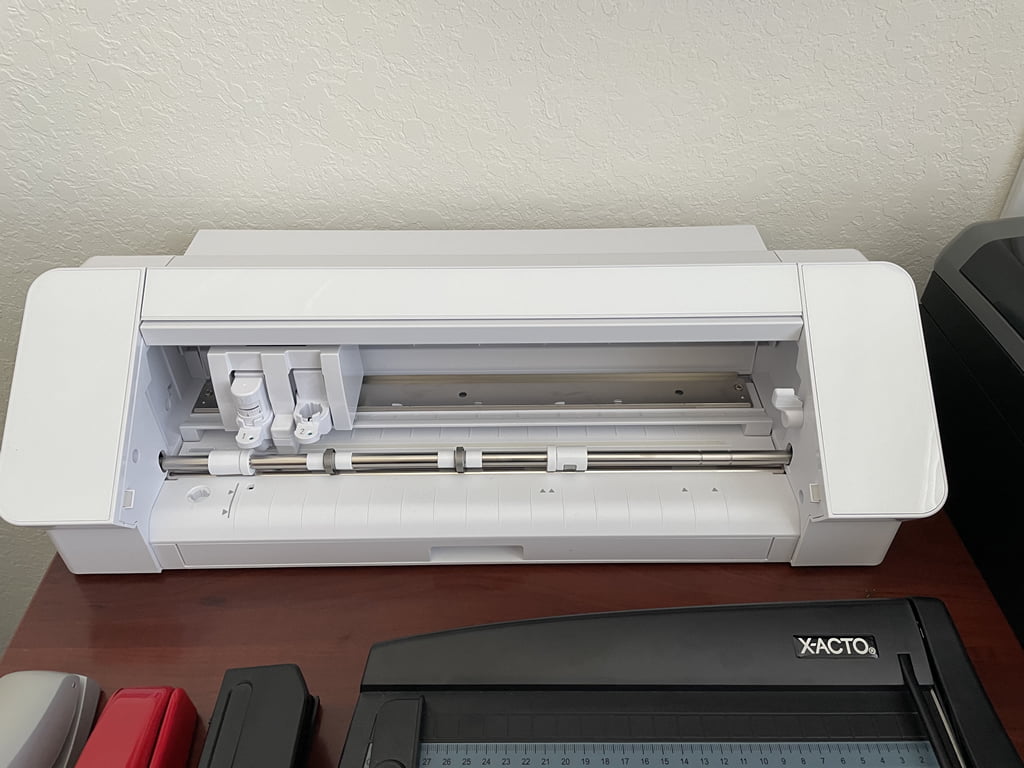
I won’t go into detail on how I used the software as there are plenty of tutorials online on how to do it. But essentially you import your image file into the software and it will allow you to quickly identify all the outlines of what you want to cut. You then print the image from the software and it will add some additional alignment markings. Then, you load the previously printed sticker paper into the machine and using the alignment markings the printer knows exactly where to cut the shapes, allowing you to peel the perfectly printed and cut stickers right off the backing! Very cool!
Final Result
The final result is exactly what I was hoping for. I am now able to print custom placards for any purpose easily. While the overall cost is a lot more than perhaps buying a sheet or two of pre-printed decals from an online flight simulation store/hobbyist, I am now at liberty to create exactly what I need when I need it, and the cutter will be used for other crafts as well, so I feel it was a good investment for me personally. Perhaps I’ll even make a business selling stickers in the future, we’ll see 🙂


Hi, if you mean the two rails that run from front to rear and the cross strut, yes those came…